Activity Overview
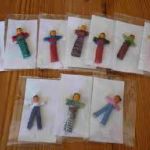
Create your own worry dolls for yourself or to give as gifts. Worry dolls have their root in Guatemalan culture. When a child is scared or worried about something, he or she is given a little bag filled with small thread wrapped dolls. The legend is that if a child tells his or her worries and fears to one of the dolls, and then places the doll under her pillow, that the doll and the worry will be gone by morning.
Make your own worry dolls to conquer your own fears and thoughtfully give them as gifts to others. They are rather easy to make and only require a few materials that you may already have at home. If giving them as a gift, you may want to include instructions or a little history on their meaning and origin.
Materials Needed
- Embroidery thread in different colors
- Glue sticks and Glue Gun
- Several toothpicks
- Pony Beads
How to Make Them
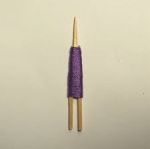
- You will need 3 toothpicks for each doll. Leave one toothpick intact. This will be your body. Fold the other two toothpicks in half without separating them. The folded toothpicks will become the arm and legs of the doll.
- Use your glue gun to adhere one of the folded toothpicks for legs to the torso.
- Place a dot of glue on the back of the doll, where Place a piece of thread into the glue, and with that as the starting point. wind the embroidery thread tightly around the waist and the legs.
- You can switch out different colored thread throughout this process to make your doll more colorful. Simply cut the thread and start wrapping the next color slightly overlapping that end which will secure it in place.
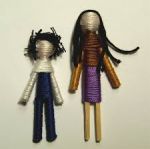
- For a girl doll, wind it around both legs together to create a skirt. For a boy, do the legs separately to make pants. When you reach the end, cut the thread and glue it in place.
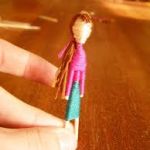
- Attach the arms to the torso, in any position that you'd like. Wrap the thread exactly like before and cover the arms and upper torso of your doll. Glue the thread in place when you are done.
- Fill the hole in a plastic bead with glue and slip it over the exposed end of the torso.
- Allow the glue to dry.
- Follow the same technique as above to wrap the beaded head in thread. Begin at the top and work your way down to the neck and secure at the back of the neck with glue.
- Cut small pieces of thread to glue to the top of the head for hair. Make longer hair for girls and shorter hair for boys.
- Package them in small baggies or tiny boxes.